Important: Before making any spring changes, make sure that your coilovers are setup correctly by reading our Coilover Setup Guide.
If your vehicle does not settle to the desired ride height or if you need to add more than 4" of preload, then your springs need to be changed.
To skip reading and jump straight to the video Click Here.
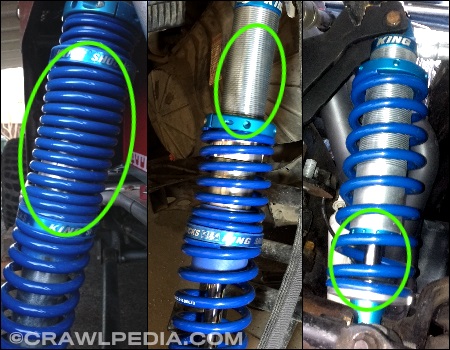
Incorrect springs, like the examples shown above, will not only result in bad performance, but can also result in damage to the shock if not fixed. In many cases, if the springs are not too far off, only one spring needs to be changed as the other can be moved up or down.
The goal for most performance applications is a combination of springs that are as light as possible, yet strong enough to support the vehicle at the ride height that you want without needing more than a few inches of preload.
Filthy Motorsports offers free spring exchanges with all new coilover orders.
Step 1: Calculate Your Effective Coilover Load
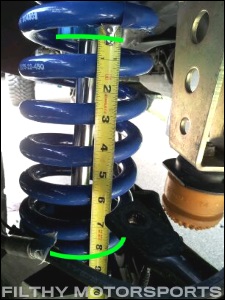
Measure the Height of the Lower Springs Under Load
While you may have calculated your corner weight when you initially ordered your coilovers, the real world always ends up being a little different. Luckily, the easiest way to accurately determine your ideal spring rates is to calculate them based on your existing springs.
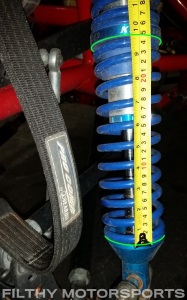
With the vehicle sitting under its own weight, and the preload adjusted to give you at least an inch or two of shaft exposed, measure the current height of the lower spring to within a quarter of an inch.
The bottom spring is the one measured because it is always supporting the entire corner weight of the vehicle whereas the upper spring can be limited by the stop nuts.
Note: New coilovers have a tendency to stick in certain positions, particularly on lighter vehicles. If this is the case, cycle the suspension in both directions and do you best to find the equilibrium point before taking your measurement.
Determine Your Lower Spring Specifications
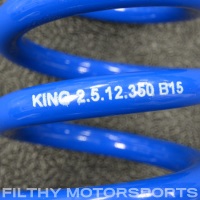
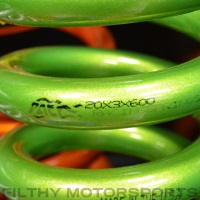
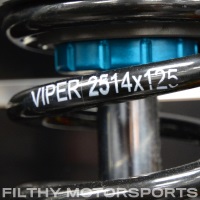
The other information needed to calculate your effective sprung corner weight is the free height of the lowest coil and its spring rate (measured in lbs.). Most new coilover springs will have this information printed on the side of the coil. If not, you may need to remove the coil from the shock and look for the spring rate engraved on the top of the spring and then measure the free length with a tape measure.
Spring specs include the inner diameter (2.5, 3.0, 3.75), height (4 to 26) and spring rate (80 to 1000).
(2.5 x 12" x 350 lb. King / 3.0 x 20" x 600 lb. PAC / 2.5 x 14" x 125 lb. Viper)
Calculate The Effective Sprung Corner Weight
To compute the effective corner weight, you start by finding how much the lowest spring compresses under the weight of the vehicle. This is done by subtracting the measured height of the spring from the free height. Then, to calculate the effective corner load, you multiply the compression distance by the spring rate.
Example: A 2.5x14x250lb. lower spring with a 10" measured height under load.
With the effective corner weight now known, the next step is to find how much the correct springs need to squat in order to settle the vehicle at or slightly below your desired ride height. At this point you should have already decided where along the coilover's travel you want the vehicle to settle (either a known position or a set distance up or down from where the vehicle sits now). The measurement used for this calculation needs to be the number of inches of exposed shaft desired at ride height.
Here are some common ride heights by vehicle type:
Technical Rock Crawler
4-5" of shaft showing at ride height.
Tough Truck / Trail Truck / Snow
5-6" of shaft showing at ride height.
Desert Truck / Prerunner
50% shaft showing at ride height (mid-shaft).
Sandrail or Dune Buggy
66% shaft showing at ride height (2/3).
Mud Truck / Monster Truck
50% to 66% shaft showing at ride height.
Calculate the Required Spring Squat
Finding the required distance that the spring(s) need to squat in order to settle at the desired ride height is easy, just subtract the desired ride height from the overall travel of the coilover.
Calculate the Proper Overall Spring Rate
With the effective corner weight and required squat numbers known, all you need to do to find your required overall spring rate is to divide the weight by the squat distance.
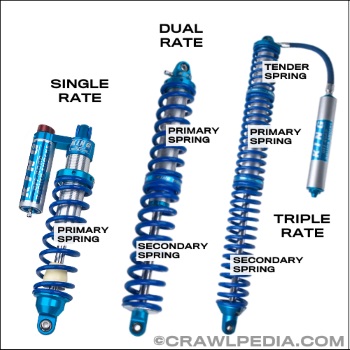
For single spring coilovers your calculation is done. Based on the example above, you would want to find a spring rate close to 110 lbs/in. which will likely be a 100 lb. spring.
Dual Rate Coilovers (8" to 16" Coilovers)
Dual rate coilovers use two springs, so you will double the required spring rate and split the difference. Using the example above, 110 lbs/in. multiplied by two is 220 lbs./in. so you will want to find two springs that split that rate, in this case a 200 lb. upper spring and a 250 lb. lower spring.
**The lighter rate spring always goes on top. For spring rates up to 250 lbs. it is good to keep the separation at 50 lbs. Spring rates above 250 lbs. can have a 100 lb. separation between the springs. Using the same spring top and bottom works fine, however, you lose the ability to transition between different spring rates.**
Triple Rate Coilovers (16" to 18" Coilovers)
Extra tall 16" and 18" coilovers used in applications with a low ride height will result in unpractically low spring rates (below 100 lbs./in.) if calculated with only two springs so a third spring is added to soak up that extra space. For triple rate applications, you will want to subtract the tender spring compression length from the shock travel and then re-run the calculations for a dual rate springs.
For example, a 16" travel coilover with a 5" tender spring that compresses down to 3" under load has 2" (5" - 3" = 2") of compression absorbed by that spring. With 2" removed from the 16" coilover, we have 14" of effective travel on the lower two springs so we can use the calculation above. Using the same example, that would give us tender spring over 200 lb. and 250 lb. springs.
**The spring rate of a tender spring is not very important as it will fully collapse under the weight of the vehicle. Triple rate springs should only be used if and when they are needed. There is no benefit to running a third tender spring if the coilovers can be set up effectively with two springs.**
These calculations are simplified and designed to get you close. There are many other factors that affect spring rates and any professional shock tuner will tell you that choosing the right springs is more of an art than it is a calculation.
IMPORTANT - Double Checking Your Spring Rates
A quick way to double check your spring rates is to take your effective sprung weight and divide it by each spring rate and add them together to get your new squat measurement.
In this example, with 1,000 lbs. effective corner weight, the coilovers with 200 lb./in. upper springs and 250 lb/in. lower springs will squat down 9" under the weight of the vehicle with no preload. If this was a 14" coilover, then that would leave 5" of shaft showing. Remember, you never want to have negative preload so this setup should not be adjusted any lower, however, 2 to 3 inches of preload could be added to get up to 8" of shaft showing at ride height. If this is not in the range you desired, try running the same calculation with higher or lower spring rates.
Step 4: Choosing Spring Size
Coil Spring Diameter (Inner Diameter)
Coilover shocks come in 2.0", 2.5", and 3.0" sizes and these measurement are based on the outside diameter of the cylinder. Springs, on the other hand, are sized based on their inner diameter and a very common mistake is to match the coilover size to the spring size. Coilover springs must actually be a bit bigger than the coilover to account for the ID shrinking as the coil spring compresses and twists. The proper spring sizes for each coilover size are listed below:
2.0" Coilovers use 2.5" ID Coil Springs
2.5" Coilovers use 3.0" ID Coil Springs
3.0" Coilovers use 3.75" ID Springs
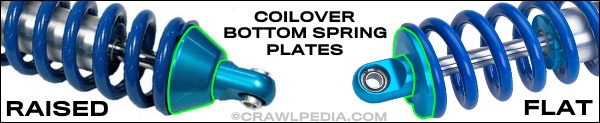
Coil Spring Heights (Free Length)
If your coilover has a raised bottom spring plate, then it is best to run two springs that match the travel of your coilover. If you have a 14" coilover with a raised bottom spring plate, then you would run two 14" tall springs. This is the preferred combination because it allows you to run each spring on the top or the bottom for simplified spring changes.
For coilovers with flat bottom spring plates, the lower spring needs to be 2" longer than the travel of the shocks and the upper spring would match the travel. For example, a 14" coilover with a flat bottom spring plate would use a 16" lower spring and a 14" upper spring.
There are, of course, many exceptions to the above rule-of-thumb, including triple rate coilovers, cases where built-in preload is needed, and tight applications were coil-binding might be an issue. When in doubt, add up your coil spring heights including 3/4" for each slider and then subtract the squat and overall shock stoke and compare that with your spring compressed lengths and make sure everything works out with room to spare.
Video: Coilover Springs, Spring Rates, and Calculations
Shock Rebuild Instructions - Detailed step-by-step instructions for rebuilding high-performance shocks. Shock Rebuilding Tools - A list of tools needed to service high-performance shocks and coilovers. Shock Valving Guide - A guide to high-performance shock valving and valving shim configurations. Shock Tuning Guide - A guide to how high-performance shocks are tuned and valved to work well. Shock Valving Shim Stack Examples - A list of common, basic valving shim stack configurations for high-performance shocks. Coilover Spring Rate Calculator - A calculator to help you determine a good starting point for coilover spring rates. 4-Link Suspension Guide - A quick overview of the most important elements of 4-link geometry. Shock Rebuild Parts - A link to Filthy Motorsports' shock parts page. How To Measure For Coilovers - Order the right size shocks and coilovers by following these detailed instructions. Coilover Install and Setup Guide - Proper coilover installation, setup, and fine tuning instructions. ORI STX Struts Guide - An introduction to ORI STX Struts, how they work and how to tune them. Hydraulic Bump Stop Guide - A detailed overview of hydraulic bump stops and jounce shocks for off-road use.
Filthy Motorsports
High performance off-road racing parts and professional shock tuning. Learn more at FilthyMotorsports.com
Shock Service, LLC
Professional shock tuning and rebuilding services for King and ADS shocks. Learn more at ShockService.com
Polar Cryogenics
Cryogenic treatment improves strength and longevity of gears, axle, and brakes. Learn more at PolarCryogenics.com
Crown Race Gears
Race-spec ring and pinion gears for desert racing, rock bouncing, and rock crawling. Learn more at RaceGears.com
This website uses cookies or similar technologies to enhance your browsing experience. By continuing to use our website, you agree to our Privacy Policy